Kubernetes lifecycle management in an enterprise VMware environment involves more than changing a version number. Platform teams must understand which Kubernetes releases are available, how those releases are delivered, which versions are supported, and how application workloads behave when clusters and worker nodes are updated.
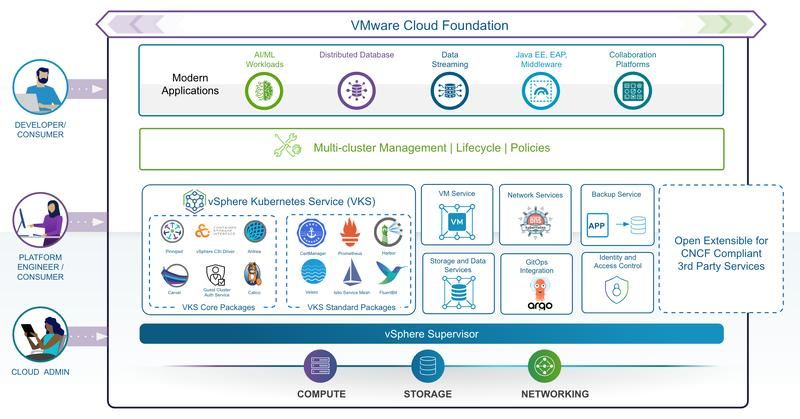
In VMware Cloud Foundation (VCF) 9.1 environments, VMware vSphere Kubernetes Service (VKS) provides a platform for provisioning and managing Kubernetes clusters. The lifecycle of those clusters interacts with several related components, including the Supervisor, VKS service capabilities, vSphere Kubernetes Releases (VKRs), networking, storage, and application workloads.
These components do not necessarily share one upgrade schedule.
A Kubernetes release can become available independently of a broader platform release, depending on the supported VKS release-delivery model. Conversely, making a new Kubernetes release available does not automatically mean every existing cluster should be upgraded immediately.
The challenge is to coordinate these lifecycle changes without creating unnecessary application downtime, compatibility problems, or operational risk.
This article explains how VKS lifecycle management works conceptually, how enterprises can manage Kubernetes release consumption, and how to prepare for upgrades through compatibility checks, PodDisruptionBudgets, rolling node replacement, add-on validation, performance tuning, and controlled operational governance.
What You Will Learn
- How VCF, Supervisor, VKS, and Kubernetes release lifecycles relate to one another.
- What VKRs represent and how Kubernetes release availability affects cluster management.
- How asynchronous release delivery can separate Kubernetes release consumption from broader platform upgrades.
- How to evaluate version compatibility, support windows, and upgrade readiness.
- How PodDisruptionBudgets and rolling worker replacement affect workload availability.
- How to validate CNI, CSI, and other add-ons before upgrading.
- How to use TuneD profiles and performance tuning as part of day-2 operations.
- How to organize lifecycle governance across lab, development, test, and production.
- How to capture cluster state before, during, and after an update.
Table of Contents
- Understanding the VKS Release Lifecycle
- vSphere Kubernetes Releases (VKRs)
- Asynchronous VKS Releases
- Content Delivery and Release Consumption
- Version Compatibility and Support Windows
- Upgrade Readiness Checks
- PodDisruptionBudgets and Workload Availability
- Rolling Node Replacement
- CNI, CSI, and Add-on Compatibility
- Application Validation Before and After Upgrades
- TuneD Profiles and Performance Tuning
- Operational Governance Across Environments
- Hands-On Lab
- Troubleshooting and Common Upgrade Blockers
- Key Takeaways
- What I Learned
- Continue the Series
1. Understanding the VKS Release Lifecycle
VKS lifecycle management involves multiple related layers. Understanding their responsibilities helps platform teams decide what needs to change, what can remain in place, and which compatibility checks are required before an update.
VCF Lifecycle
The VCF lifecycle covers the management of the broader private-cloud platform and its components. Depending on the deployment, this includes infrastructure software, vSphere, networking, storage, and platform services.
A VCF lifecycle operation may involve a broader set of infrastructure changes than a Kubernetes cluster upgrade.
For example, updating a supported Kubernetes release for a workload cluster is a different operation from upgrading the underlying VCF platform. They may have dependencies, but they should not automatically be treated as one indivisible change.
Platform administrators must still verify whether a particular VKS release requires changes to the underlying platform or other dependencies.
Supervisor Lifecycle
The Supervisor provides the platform services and management environment used by supported VKS workflows.
Its lifecycle must remain compatible with the Kubernetes clusters and capabilities it supports. Supervisor maintenance, platform-service updates, and Kubernetes cluster upgrades may therefore have separate procedures and prerequisites.
Before planning an update, identify:
- The current Supervisor version and configuration.
- The target VKS capabilities required by the cluster.
- Any documented platform prerequisites.
- Whether the intended update changes the supported cluster lifecycle workflow.
- Whether additional maintenance or compatibility steps are required.
A cluster administrator should not assume that a workload cluster can consume every available Kubernetes release regardless of the Supervisor and VKS service versions.
VKS Service Lifecycle
The VKS service manages supported cluster lifecycle operations, including provisioning, scaling, upgrading, and cluster health management. Its capabilities determine which Kubernetes releases and cluster configurations are available through the platform.
This lifecycle layer is particularly important because it separates the management capabilities offered by the platform from the version of Kubernetes running inside an individual cluster.
A VKS service update and a Kubernetes cluster upgrade are related operations, but they are not synonymous.
Kubernetes Release Lifecycle
The Kubernetes release lifecycle concerns the version running in the cluster and the supported path to move to another version.
A target release can affect:
- The control plane.
- Worker nodes and their Kubernetes components.
- Supported operating-system images and dependencies.
- Networking and storage integrations.
- Cluster add-ons.
- Application APIs and workload behavior.
A Kubernetes release update should therefore be treated as a coordinated change across the cluster rather than simply an update to the control-plane version.
VKS Lifecycle Diagram
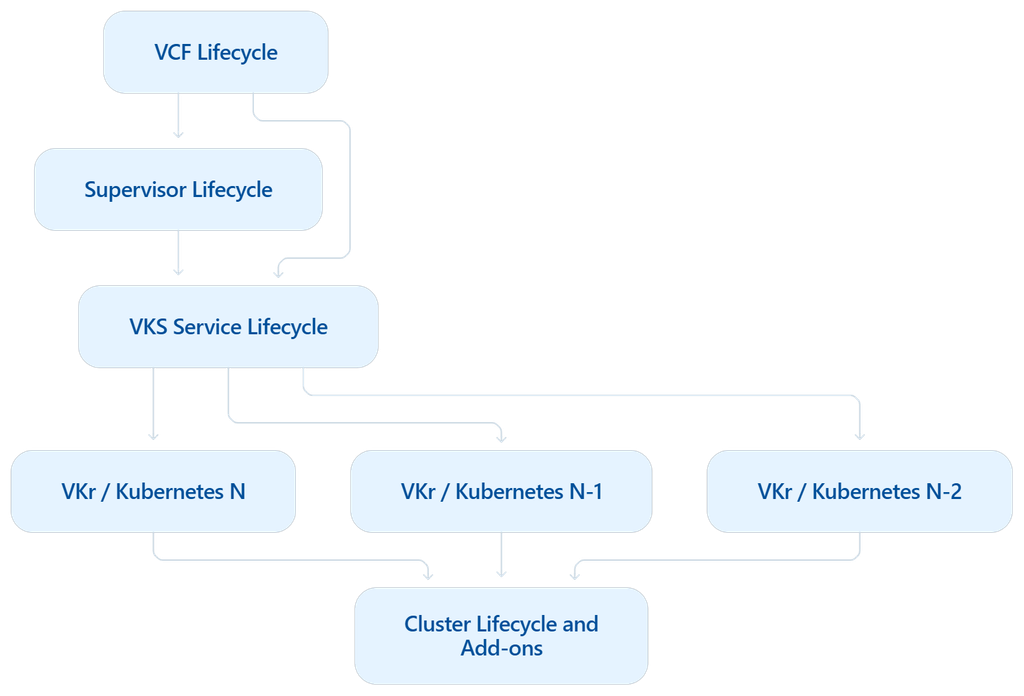
Conceptual lifecycle relationship. This diagram is not an exact dependency graph or a guarantee that all three example releases are simultaneously available. Actual dependencies and available versions must be verified for the deployed release.
The diagram illustrates the key idea: platform lifecycle, service lifecycle, and workload-cluster release lifecycle are related but distinct.
The labels N, N-1, and N-2 represent relative release positions, not specific Kubernetes versions or a guarantee of support.
2. vSphere Kubernetes Releases (VKRs)
A vSphere Kubernetes Release (VKr) represents a Kubernetes release made available through the VKS platform’s release-management mechanism.
In practical terms, a VKr is more than a version number displayed in a dashboard. The release may include the Kubernetes version and associated components or dependencies required by the platform’s supported cluster configuration.
The exact metadata and packaging depend on the release implementation.
Why VKrs Matter
Without a controlled release mechanism, different teams might install arbitrary Kubernetes versions and independently assemble the supporting components.
A platform-managed release approach helps administrators work with releases that are made available through the supported platform workflow.
VKrs are relevant to:
- Selecting a Kubernetes version when creating a cluster.
- Determining which releases are available for existing clusters.
- Planning a cluster upgrade.
- Maintaining consistent versions across environments.
- Evaluating compatibility with networking, storage, and other components.
The VKS API documentation describes the platform’s cluster-management capabilities and release-related resources. Use the API and configuration documentation for the exact resource types supported by your installed version.
Kubernetes Version vs. VKr Release
These terms are related, but they should not be used interchangeably.
| Term | Meaning |
|---|---|
| Kubernetes version | The upstream Kubernetes version, such as a particular major, minor, and patch release |
| VKr | The platform-managed release representation used by the applicable VKS workflow |
| VKS service version | The version of the service providing cluster lifecycle capabilities |
| Supervisor version | The version of the Supervisor environment supporting the relevant platform services |
| VCF version | The version of the broader private-cloud platform |
A VKr can identify a platform-specific release that includes more information than the upstream Kubernetes version alone.
Consequently, two releases that share an upstream Kubernetes version should not automatically be assumed to be identical in their platform-specific components, packaging, or compatibility.
Release Selection During Cluster Creation
When provisioning a new cluster, the platform team should select a supported release that meets the application’s requirements and the organization’s version policy.
The decision should consider:
- Availability in the VKS environment.
- Platform compatibility.
- Application API requirements.
- CNI and CSI compatibility.
- Add-on and operator support.
- Security and maintenance requirements.
- Expected upgrade path and support window.
Avoid selecting a release solely because it has the highest version number. The newest available release may still require validation against application dependencies and enterprise operational standards.
Inspecting Available Releases
The exact resource names and commands depend on the VKS API and Kubernetes management context available in the environment.
Start by confirming which cluster and context you are using:
kubectl config current-context
kubectl config get-contexts
Then inspect the supported VKS management API and release resources for your deployment.
Do not assume that a generic command for a different Kubernetes distribution will reveal VKrs in every VKS environment. Some resources may only be accessible through the appropriate management context or administrative permissions.
3. Asynchronous VKS Releases
Asynchronous release delivery allows certain software releases or capabilities to become available independently of the broader platform release cadence.
This is important in enterprise environments because Kubernetes evolves continuously. Organizations may need a newer supported Kubernetes release, a security fix, or a platform capability without treating every such change as a complete VCF upgrade.
The availability and scope of asynchronous releases depend on the product’s documented release model.
Why Asynchronous Releases Matter
Consider an enterprise running a validated VCF platform that hosts several Kubernetes clusters.
The platform team may want to adopt a newer supported Kubernetes release for a specific application environment. If the required release is delivered through the supported VKS release mechanism, the team may be able to evaluate and consume it without performing a full VCF platform upgrade at the same time.
That does not mean every Kubernetes release can be installed independently of the platform. Compatibility constraints and prerequisites still apply.
The distinction is between when a release becomes available and when an organization decides to deploy it.
Release availability does not replace testing, change approval, or operational readiness.
Asynchronous Does Not Mean Uncontrolled
A release delivered outside the main platform upgrade cadence still requires governance.
Before consuming it, determine:
- Whether the release is supported with the deployed platform.
- Which clusters can use it.
- Whether a Supervisor or VKS service prerequisite applies.
- Whether existing cluster configurations remain compatible.
- Whether add-ons or applications need updates.
- Whether the organization has completed its validation process.
A release should not move directly from availability to production adoption without the appropriate checks.
Example: Separating Platform and Kubernetes Changes
Imagine an organization operating a stable VCF environment with development, staging, and production Kubernetes clusters.
A newer supported Kubernetes release becomes available through the applicable VKS release-delivery process.
The team can evaluate the change in its lab, assess the application and add-on compatibility, deploy it in development, and validate it in staging. Production adoption then follows the organization’s approved change window.
This example describes an operational strategy, not a guarantee that a specific release can be consumed on every existing platform version. Verify the documented compatibility and release prerequisites first.
4. Content Delivery and Release Consumption
Making a Kubernetes release available and applying that release to an existing cluster are separate stages.
Understanding the distinction prevents a common operational misunderstanding: a release appearing in the platform does not necessarily mean existing clusters have already been updated.
Release Content Delivery
Release content must be made available through the supported delivery mechanism.
Depending on the architecture, the process may involve platform-managed release metadata, compatible node images, required artifacts, and other dependencies.
Administrators should verify:
- Whether the release is available in the intended management environment.
- Whether required content has been delivered and is accessible.
- Whether the release is supported by the current platform configuration.
- Whether any required images or artifacts can be retrieved.
- Whether the relevant permissions and network access are configured.
The precise delivery workflow must follow the documentation for the deployed VKS version.
Release Discovery
Once a release is available to the platform, administrators need to establish which clusters can use it and whether it is an eligible upgrade target.
The existence of a release does not establish that every cluster is eligible to consume it.
The cluster’s current version, supported upgrade path, cluster configuration, and dependencies can affect the available options.
Release Consumption
Release consumption occurs when a supported workflow uses the release to create or update a Kubernetes cluster.
For an existing cluster, the target release must be compatible with the intended upgrade path. The platform may also coordinate the upgrade of supporting components according to their compatibility requirements.
The VKS API reference documents release-related resources and add-on compatibility mechanisms; consult the matching version of that documentation before designing automation.
Release Consumption Workflow
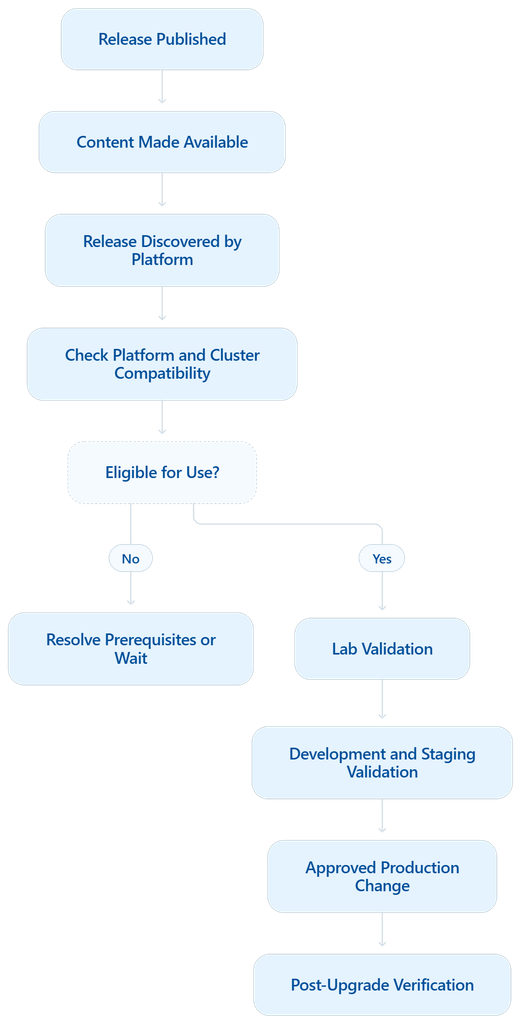
This workflow makes an important distinction between platform readiness and organizational readiness. A release can be technically available while still awaiting application testing or change approval.
5. Version Compatibility and Support Windows
Version compatibility is one of the most important factors in lifecycle planning.
An upgrade can affect the Kubernetes control plane, worker nodes, API clients, networking components, storage integrations, operators, admission webhooks, and application manifests.
A version that works in a lab is not automatically supported in production, and a version supported by upstream Kubernetes is not automatically supported by every VKS platform configuration.
Kubernetes Version Compatibility
Kubernetes defines version-skew rules governing the supported differences between components such as the API server, kubelet, kube-proxy, and kubectl. Platform-specific tooling may impose additional restrictions.
This means administrators must consider more than the version shown for the control plane.
Before upgrading, verify:
- The current control-plane version.
- The intended target version.
- Worker-node compatibility.
- The supported upgrade sequence.
- The version requirements of platform-managed components.
- The supported version of
kubectlused for administration.
Do not bypass the platform’s supported upgrade workflow simply because an upstream version-skew combination appears technically permissible.
CNI and CSI Compatibility
The CNI provides pod networking, while the CSI integration provides the interface through which Kubernetes workloads consume supported storage systems.
An upgrade can expose incompatibilities in either area.
For example, a networking add-on may require a particular Kubernetes version range, while a storage integration may depend on specific node components or supported configuration.
The team should verify the compatibility of the exact versions deployed rather than assuming that a component remains supported simply because it was working before the upgrade.
API Deprecation and Application Compatibility
Kubernetes releases can remove APIs that were deprecated in earlier versions.
An application may continue to run initially while a controller, Helm chart, operator, or deployment pipeline still depends on an API that is no longer served by the target release.
Review:
- API versions used by manifests.
- Helm chart compatibility.
- Operator support matrices.
- Admission webhooks.
- Custom Resource Definitions (CRDs).
- Automation scripts and deployment pipelines.
Test the actual application deployment process against the target version, not only the existing running pods.
Support Windows
A support window determines how long a particular software release remains eligible for support under the applicable vendor or project policy.
The Kubernetes project’s release policy is not identical to Broadcom’s support policy for VKS or VCF. For example, upstream Kubernetes maintains a defined set of actively supported minor-release branches, while vendor support is governed by the relevant product lifecycle and support documentation.
Enterprise administrators should track both where relevant:
- Upstream Kubernetes maintenance and security updates.
- Vendor support for the deployed VKS release.
- VCF and Supervisor compatibility.
- Add-on and application vendor support.
- Internal security and compliance deadlines.
Do not use an upstream end-of-life date as a substitute for the applicable VKS product-support date.
Version Compatibility Checklist
| Area | What to validate |
|---|---|
| VCF and Supervisor | Supported platform configuration and prerequisites |
| VKS service | Required capabilities and supported upgrade workflow |
| Kubernetes | Supported target version and upgrade sequence |
| Node images | Compatibility and availability of required artifacts |
| CNI | Supported networking version and configuration |
| CSI | Supported storage integration and driver version |
| Add-ons | Compatibility with the target control plane and worker nodes |
| Applications | API, runtime, operator, and dependency compatibility |
| Support window | Vendor support and organizational retirement deadlines |
A version compatibility record gives the platform team a documented basis for approving or delaying an upgrade.
6. Upgrade Readiness Checks
An upgrade should begin with a review of the current cluster’s state and its ability to tolerate the planned change.
The goal is not merely to confirm that the target version is available. The goal is to identify blockers before the upgrade starts.
Capture the Current Cluster State
Run the following commands from the correct Kubernetes management context:
kubectl get nodes -o wide
kubectl get deployments -A
kubectl get pods -A
kubectl get pdb -A
Record the output before making changes.
Look for:
- Nodes that are not
Ready. - Deployments that have unavailable replicas.
- Pods in
Pending,CrashLoopBackOff, or other unexpected states. - Existing PodDisruptionBudgets that may block voluntary disruptions.
- Workloads that already have insufficient replicas.
- Persistent volumes or stateful applications that require special handling.
An upgrade is harder to diagnose if the cluster was already unhealthy beforehand.
Review Capacity and Scheduling
A rolling upgrade or node replacement can temporarily reduce available compute capacity.
Before draining a node, confirm that the remaining nodes can accommodate the affected workloads.
Check:
- CPU and memory capacity.
- Pod resource requests and limits.
- Node selectors, affinity, and anti-affinity.
- Taints and tolerations.
- Topology constraints.
- Storage attachment and scheduling requirements.
- Available capacity for replacement nodes.
A cluster can have enough total CPU and memory while still failing to reschedule a workload because of node affinity, storage constraints, or topology rules.
Check Application Availability
Review replica counts, readiness probes, and application health before starting.
For replicated applications, confirm that sufficient healthy replicas are available to tolerate the planned disruption.
For stateful applications, check replication, quorum, storage availability, and recovery procedures. A PodDisruptionBudget alone cannot guarantee data safety or application continuity.
Check Add-ons and APIs
Review the compatibility of the CNI, CSI, monitoring agents, policy controllers, ingress or gateway components, operators, and other add-ons.
Also check whether application manifests use deprecated APIs that may be removed in the target version.
The upgrade plan should identify any component that must be updated before, during, or after the Kubernetes version transition.
Confirm Recovery and Change Controls
Before an approved production upgrade, establish:
- A documented change plan.
- The responsible operators and escalation contacts.
- The maintenance window.
- Required pre-upgrade backups or recovery points.
- Application validation criteria.
- Monitoring and alerting coverage.
- The decision criteria for pausing or aborting the operation.
- The supported recovery or remediation procedure.
Do not assume that a Kubernetes version downgrade is supported. Many cluster lifecycle systems do not support arbitrary rollback to an earlier version. Recovery should be planned according to the supported product procedures and application recovery requirements.
7. PodDisruptionBudgets and Workload Availability
A PodDisruptionBudget (PDB) helps protect replicated applications during voluntary disruptions, such as node maintenance or an upgrade workflow that safely evicts pods.
It does not guarantee that an application will remain available under every failure condition. PDBs limit certain voluntary disruptions; they do not prevent involuntary failures, and they do not replace application-level redundancy.
How a PDB Works
A PDB specifies the number or proportion of selected pods that may be unavailable during supported voluntary disruptions.
For example, imagine a frontend deployment with three replicas.
If its PDB specifies minAvailable: 2, the disruption mechanism should preserve at least two available replicas when evaluating voluntary pod evictions.
This helps prevent a node drain from evicting too many replicas at once.
However, the actual outcome also depends on pod health, the workload controller, scheduling capacity, and the disruption mechanism used.
Example PDB Configuration
The following is an illustrative Kubernetes manifest. The label selector must match the intended application pods.
apiVersion: policy/v1
kind: PodDisruptionBudget
metadata:
  name: frontend-pdb
  namespace: production
spec:
  minAvailable: 2
  selector:
    matchLabels:
      app: frontend
This example is suitable only if the application has enough matching replicas and the chosen budget matches its availability requirements.
For a workload with only one replica, minAvailable: 2 cannot be satisfied. For a workload with three replicas, the configuration permits at most one replica to be unavailable through the relevant voluntary-disruption mechanism when the other conditions are satisfied.
Inspect Existing PDBs
Use:
kubectl get pdb -A
kubectl describe pdb <pdb-name> -n <namespace>
Pay attention to:
MIN AVAILABLE.MAX UNAVAILABLE.ALLOWED DISRUPTIONS.- Current healthy and desired pod counts.
- Whether the selector matches the intended application.
If ALLOWED DISRUPTIONS is zero, a drain may be blocked until additional replicas become healthy or the disruption budget is appropriately revised.
PDBs Are Not a Substitute for Application Resilience
A PDB does not automatically create replicas, repair failed applications, or guarantee that replacement pods will become ready.
It also does not block every type of disruption. For example, an application rollout controlled by a Deployment uses its own rollout strategy; a PDB does not impose the same eviction restriction on that rollout.
Before upgrading, verify that the application can tolerate node maintenance, that its replicas are distributed appropriately, and that enough resources are available to reschedule workloads.
8. Rolling Node Replacement
Rolling node replacement is a lifecycle technique in which nodes are updated or replaced progressively rather than removing every worker at once.
In a VKS-managed cluster, the platform’s supported upgrade workflow should manage the relevant lifecycle operations. The conceptual process below explains the availability considerations; it is not an instruction to manually delete VKS-managed node VMs.
The Rolling Upgrade Concept
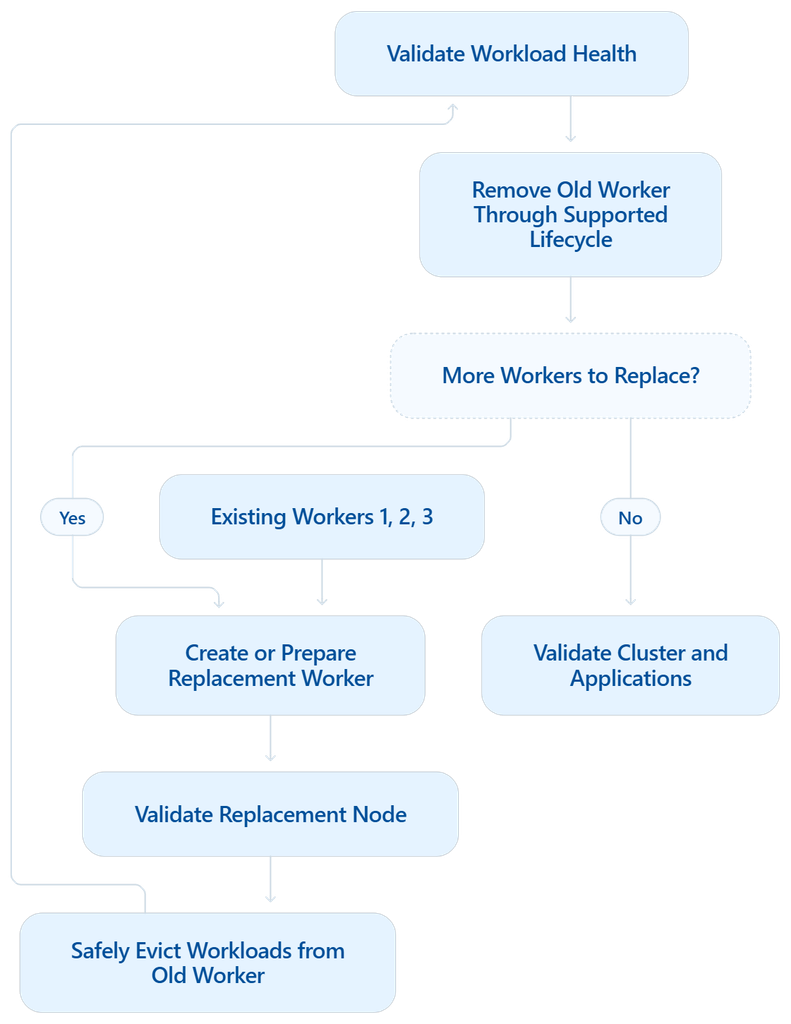
The exact order of node creation, draining, control-plane upgrades, and node replacement depends on the VKS release and cluster configuration. Follow the supported platform upgrade workflow rather than treating this conceptual sequence as a universal implementation.
Step 1: Establish the Baseline
Before replacing any worker, capture node health, application replicas, PDB status, storage health, and networking status.
kubectl get nodes -o wide
kubectl get deployments -A
kubectl get pods -A
kubectl get pdb -A
This establishes the baseline for comparison after the replacement.
Step 2: Prepare Replacement Capacity
Replacement capacity must be available before workloads can safely move away from an old worker.
Validate:
- CPU and memory capacity.
- Network and IP allocation.
- Storage compatibility.
- Node scheduling requirements.
- Required add-ons and node configuration.
- The cluster’s configured worker-pool lifecycle.
A replacement node that is created successfully but cannot become Ready is not a usable replacement.
Step 3: Drain the Old Worker
Draining marks a node as unavailable for ordinary new scheduling and attempts to evict eligible pods gracefully.
A generic Kubernetes drain command is:
kubectl drain <node-name> --ignore-daemonsetsImportant: this command is included to explain Kubernetes node-drain behavior. Do not run it against a VKS-managed node during a platform upgrade unless the applicable VKS documentation and approved operational procedure explicitly call for that action. The supported VKS lifecycle controller may need to coordinate node changes itself.
The command also does not bypass PDB restrictions simply because --ignore-daemonsets is specified. Other drain requirements and exceptions still apply. Kubernetes documents safe draining and disruption-budget behavior in its official guidance.
Step 4: Validate Workload Health
After the platform performs the relevant node transition, inspect the cluster:
kubectl get nodes -o wide
kubectl get deployments -A
kubectl get pods -A
kubectl get events -A --sort-by=.lastTimestamp
Confirm that:
- The replacement node is
Ready. - Expected workloads are scheduled.
- Deployments have their desired available replicas.
- Stateful workloads remain healthy.
- No unexpected scheduling or storage failures are present.
A successful node replacement does not by itself prove that the application is healthy.
Step 5: Repeat and Verify
Continue through the supported lifecycle workflow until the intended nodes have been updated.
Avoid assuming that all worker nodes can be upgraded in parallel. Parallelism, disruption budgets, cluster topology, and platform constraints can affect the safe upgrade sequence.
After completion, verify the cluster version, node health, add-on compatibility, application behavior, and monitoring status.
9. CNI, CSI, and Add-on Compatibility
Kubernetes lifecycle management includes supporting components, not just the Kubernetes control plane and worker nodes.
A cluster can report the expected Kubernetes version while a networking, storage, or application-support component remains incompatible or unhealthy.
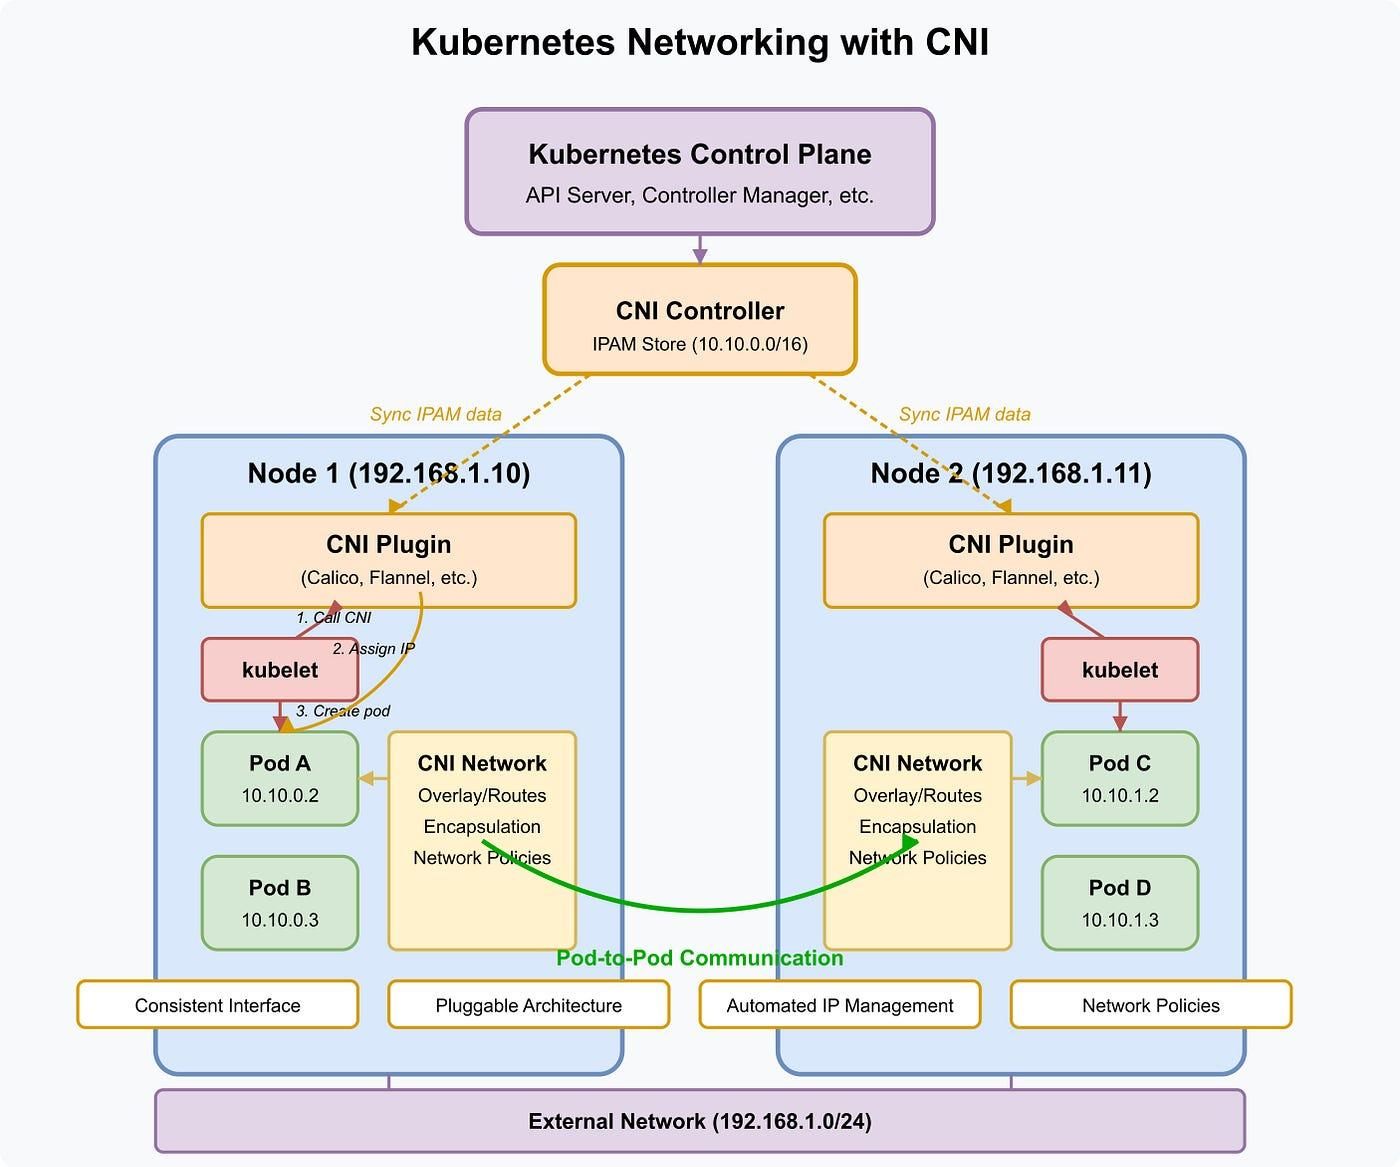
CNI Compatibility
The Container Network Interface provides the networking integration used by pods.
Before upgrading, verify:
- The supported CNI version for the target Kubernetes release.
- Compatibility with the target node environment.
- Required configuration changes.
- Network-policy behavior.
- Overlay or routing behavior where applicable.
- The availability of required CNI images and artifacts.
After the upgrade, validate pod-to-pod connectivity, Service connectivity, and the required external paths.
CSI Compatibility
The Container Storage Interface connects Kubernetes storage workflows with supported storage systems.
Before upgrading, verify the CSI driver’s compatibility and any platform-specific prerequisites.
Check:
- Storage classes and volume provisioning.
- Existing persistent volume claims.
- Volume attachment and mount behavior.
- Stateful application recovery.
- Snapshot or backup mechanisms, where applicable.
- Required permissions and storage policies.
A storage class existing in the cluster does not guarantee that new volumes can be provisioned or that existing workloads can mount their volumes successfully.
Add-on Compatibility and Upgrade Ordering
Some VKS lifecycle implementations provide metadata or mechanisms for coordinating add-on upgrades with cluster upgrades.
The VKS API reference describes add-on compatibility constraints based on target Kubernetes and worker versions, and how those constraints can influence the stage at which an add-on is updated. The exact behavior depends on the applicable API and platform version.
This matters because add-ons may need to be updated before a control-plane or worker transition to remain compatible.
Do not assume every add-on is upgraded automatically or that every third-party component participates in the platform’s lifecycle workflow.
Maintain an inventory of:
- Platform-managed add-ons.
- CNI and CSI components.
- Operators and CRDs.
- Monitoring and logging agents.
- Ingress or gateway controllers.
- Admission webhooks.
- Security agents.
- Any manually managed supporting components.
For each component, record its owner, current version, target-compatible version, upgrade procedure, and validation criteria.
10. Application Validation Before and After Upgrades
A technically successful cluster upgrade can still expose application problems.
Applications may depend on deprecated APIs, particular runtime behavior, storage characteristics, network policies, or external services that change during the lifecycle operation.
Application validation must therefore be a formal part of the upgrade plan.
Before the Upgrade
Capture the application’s baseline:
- Desired and available replicas.
- Pod readiness and restart counts.
- Service endpoints.
- Recent application errors.
- Response times or latency metrics where available.
- Persistent volume status.
- Relevant background jobs and scheduled tasks.
- External dependencies and integration tests.
Example commands:
kubectl get deployments -A
kubectl get statefulsets -A
kubectl get pods -A
kubectl get svc -A
kubectl get pvc -A
Use the output to identify existing problems before introducing the upgrade.
During the Upgrade
Monitor:
- Cluster and node readiness.
- Pod eviction and rescheduling.
- Application availability.
- PDB-related blockers.
- Persistent storage attachment.
- CNI and CSI component health.
- Relevant warnings and error events.
Do not judge success solely by whether the control plane remains reachable.
After the Upgrade
Repeat the baseline checks and run application-level validation.
kubectl get nodes -o wide
kubectl get deployments -A
kubectl get pods -A
kubectl get svc -A
kubectl get pvc -A
Then execute the application’s approved smoke tests, integration tests, and critical user workflows.
Examples include:
- Logging in and completing a representative transaction.
- Calling a critical API.
- Reading from and writing to persistent storage.
- Verifying message processing or background jobs.
- Confirming monitoring and alert delivery.
- Testing the required network paths.
Compare the post-upgrade state with the recorded baseline. Investigate unexpected differences before declaring the change complete.
Define Success and Failure Criteria
A production upgrade plan should explicitly state what constitutes success.
For example:
| Validation area | Example success criterion |
|---|---|
| Kubernetes nodes | All expected nodes are Ready |
| Deployments | Required replicas are available |
| Networking | Critical pod and Service paths work |
| Storage | Required PVCs are bound and workloads can access their volumes |
| Add-ons | Required components are compatible and healthy |
| Application | Critical smoke tests pass |
| Monitoring | Alerts, logs, and telemetry are functioning |
| Change record | Results and outstanding issues are documented |
The criteria should be tailored to the workload. A stateless frontend and a stateful database may require different validation and recovery procedures.
11. TuneD Profiles and Performance Tuning
Lifecycle management also includes maintaining predictable performance as node images, kernel settings, workload placement, and supporting components change.
TuneD is a Linux system-tuning service that can apply profiles for specific performance or resource-use goals. Its relevance to a VKS environment depends on the node operating system, product support, and available configuration mechanisms.
Do not assume that an operating-system tuning profile can be installed or changed manually on every VKS-managed node. Verify the supported customization method for the actual release.
Why Performance Tuning Matters
A cluster can be healthy from Kubernetes’ perspective while application latency or throughput changes after an upgrade.
Potential causes include:
- Different kernel or operating-system behavior.
- CPU and memory pressure.
- Changes in workload placement.
- Storage latency.
- Network throughput or packet-processing behavior.
- Application-level changes.
- Differences in supported node or tuning configuration.
Performance tuning should start with measurement, not with applying arbitrary profiles.
TuneD Profile Considerations
Where TuneD is supported for the relevant node environment, a profile may adjust selected system parameters to align with a workload’s requirements.
Examples of tuning objectives include:
- General throughput.
- Lower latency.
- CPU-related performance behavior.
- Storage workload characteristics.
- Resource-efficiency goals.
These are broad tuning objectives, not a list of profiles guaranteed to be available in VKS.
Before using a profile, establish:
- Whether TuneD is supported on the node operating system.
- How the profile is applied and maintained.
- Whether changes persist through node replacement.
- Whether the platform permits the required customization.
- Whether the profile conflicts with existing settings.
- How the change will be measured and rolled back.
A Safe Performance-Tuning Workflow
- Establish a performance baseline.
- Identify the suspected bottleneck.
- Confirm that the proposed tuning method is supported.
- Apply the change in a controlled test environment.
- Measure latency, throughput, CPU, memory, and storage behavior as appropriate.
- Run application regression tests.
- Document the result and deploy through the approved change process.
Avoid combining a Kubernetes upgrade, CNI change, node configuration change, and performance-tuning change in a single untested operation. Separating changes makes regressions easier to identify.
12. Operational Governance Across Environments
A repeatable release process helps enterprises avoid inconsistent Kubernetes versions, undocumented exceptions, and last-minute production upgrades.
The goal is not to run every environment on exactly the same version forever. The goal is to make version differences intentional, documented, supported, and manageable.
Example Enterprise Version Policy
The following policy uses the relative release labels N, N-1, and N-2. These labels describe an organization’s chosen release sequence; they do not guarantee that every release is still supported or available.
| Environment | Example version policy | Primary purpose |
|---|---|---|
| Lab | Newest validated supported release | Explore new capabilities and identify compatibility issues |
| Development | N | Develop applications and test integrations against the selected release |
| Test/Staging | N | Validate production-like configuration and upgrade procedures |
| Production | N or N-1, depending on the validation window | Operate approved workloads on a release that meets support and compliance requirements |
| Retirement | Versions approaching end of support | Plan migration, upgrade, or retirement before support requirements are breached |
This is an example policy, not a universal recommendation. The appropriate version for each environment depends on support status, application requirements, risk tolerance, and the platform’s documented compatibility.
Lab Environment
The lab is where teams evaluate new supported releases and test proposed changes.
Typical activities include:
- Checking new release availability.
- Testing upgrade procedures.
- Evaluating add-on compatibility.
- Validating API and manifest changes.
- Testing node replacement behavior.
- Recording known issues and recovery procedures.
A lab result is evidence for further validation, not automatic approval for production.
Development Environment
Development teams use the selected Kubernetes release to build and test applications.
The platform team should maintain a documented target version and communicate planned changes to application owners.
Developers should test deployment manifests, Helm charts, operators, and integration workflows against the intended target version rather than relying exclusively on the version currently used in production.
Test and Staging Environment
Staging should approximate the production configuration closely enough to validate the intended change.
Where practical, match the relevant:
- Kubernetes and VKS release configuration.
- CNI and CSI versions.
- Application deployment configuration.
- Storage classes and policies.
- Network policies and traffic paths.
- Monitoring and security integrations.
Use staging to rehearse the supported upgrade process and record any readiness blockers, unexpected disruptions, or performance changes.
Production Environment
Production changes should follow the approved change process.
Before approval, establish that the target release is supported, the application validation plan is complete, dependencies are compatible, and recovery procedures are documented.
The organization may choose to remain one release behind development while validation is completed. That is a governance decision, not a guarantee that the older release remains supported indefinitely.
Retirement and End-of-Support Planning
Release retirement should be planned before the relevant support deadline.
Maintain an inventory of clusters, current versions, application owners, dependencies, and target upgrade dates.
When a version approaches the end of its applicable support window, assess the upgrade path, identify blockers, and agree on an accountable remediation plan.
Do not confuse a release’s presence in the platform with its continuing eligibility for support.
Example Release Governance Workflow
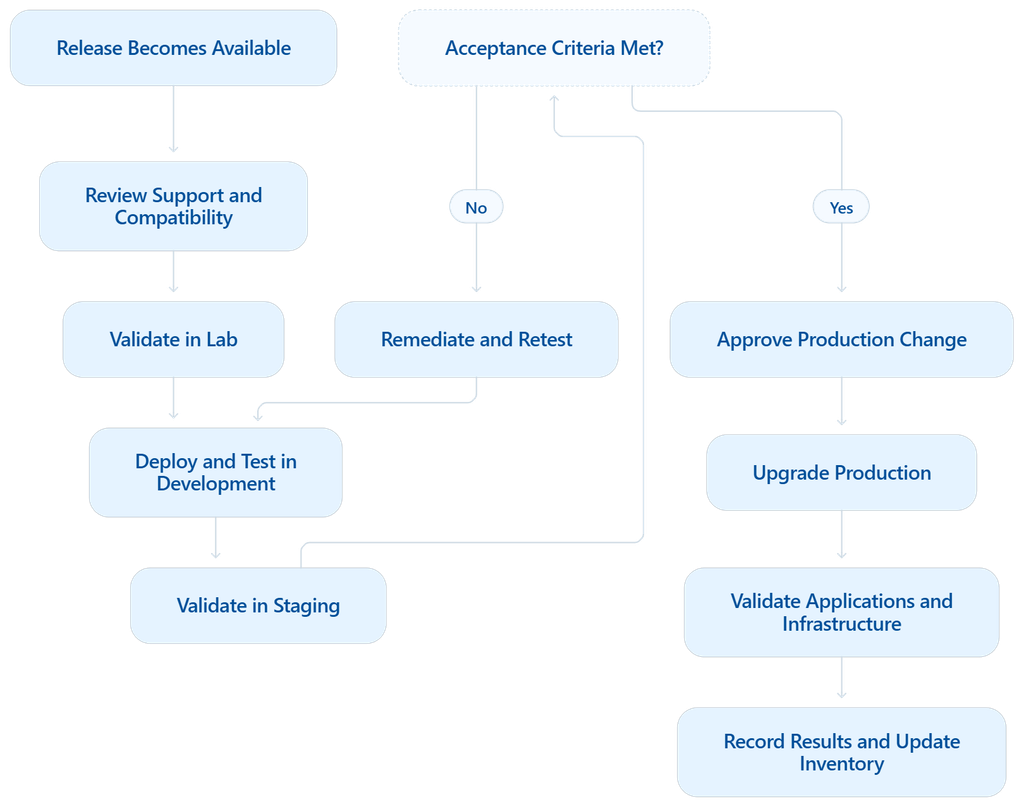
This process makes lifecycle management a controlled operational activity rather than an ad hoc reaction to a new version becoming available.
13. Hands-On Lab
This lab uses Kubernetes inspection commands to record cluster state before, during, and after a planned update.
Important: run the commands against the correct management or workload cluster context. Do not initiate an actual production upgrade simply to complete this lab. Use a supported test environment and follow the VKS-specific lifecycle workflow for the deployed release.
Step 1: Confirm the Cluster Context
Start by verifying the current context:
kubectl config current-context
kubectl config get-contexts
Expected result: the active context corresponds to the intended cluster and administrative environment.
If the context is incorrect, stop and select the correct authorized context before running further commands.
Step 2: Capture the Pre-Upgrade State
Run the commands specified in the original lab outline:
kubectl get nodes
kubectl get pdb -A
kubectl get deployments -A
kubectl get pods -A
kubectl describe cluster <cluster-name>
The first four commands inspect nodes, disruption budgets, Deployments, and pods.
Note about the final command: kubectl describe cluster <cluster-name> works only when the active Kubernetes API exposes a Cluster resource under the expected API mapping and your account has permission to read it. Depending on the VKS management architecture, the cluster resource may instead need to be inspected from the appropriate management context. Check the resource first:
kubectl api-resources | grep -i clusterIf the expected resource is not exposed, use the documented VKS management interface or API for the cluster rather than assuming the command is universally valid.
Record the following:
- Cluster identity and current Kubernetes version.
- Node names, versions, and readiness.
- Desired and available application replicas.
- Pod readiness and restart counts.
- Existing PDB configurations and allowed disruptions.
- Any pre-existing errors or warnings.
Save the outputs as your baseline for comparison.
Step 3: Check Upgrade Readiness
Review whether the cluster is in a suitable state for the planned change.
kubectl get nodes -o wide
kubectl get deployments -A
kubectl get pods -A
kubectl get pdb -A
kubectl get events -A --sort-by=.lastTimestamp
Look for:
- Nodes that are not
Ready. - Deployments with unavailable replicas.
- Pods stuck in
Pending. - Repeated container restarts.
- PDBs with zero allowed disruptions.
- Scheduling failures or storage-related events.
These commands help identify workload-level blockers. They do not establish full platform compatibility; confirm that separately using the supported VKS release and upgrade documentation.
Step 4: Verify the Target Release
Before initiating an upgrade, document:
- The current cluster release.
- The intended target release.
- The target’s availability through the supported VKS workflow.
- Platform and cluster compatibility.
- CNI, CSI, and add-on compatibility.
- The approved upgrade procedure.
- The application’s acceptance criteria.
Do not substitute a generic Kubernetes upgrade procedure for the VKS-supported lifecycle workflow.
Step 5: Monitor the Upgrade
During an authorized test upgrade, collect the same baseline commands at appropriate intervals:
kubectl get nodes -o wide
kubectl get deployments -A
kubectl get pods -A
kubectl get pdb -A
kubectl get events -A --sort-by=.lastTimestamp
Document:
- When the update started.
- Which nodes or components changed.
- Any temporary readiness issues.
- Pod evictions or rescheduling.
- Any PDB-related blockers.
- Any unexpected application or storage behavior.
- How long recovery or readiness took, if measured.
Do not infer that no disruption occurred simply because a brief inspection shows all pods running. Compare the observations and application telemetry throughout the change.
Step 6: Validate the Post-Upgrade State
After the supported upgrade workflow reports completion, repeat the baseline inspection.
kubectl get nodes -o wide
kubectl get deployments -A
kubectl get pods -A
kubectl get pdb -A
kubectl get pvc -A
Then validate the relevant application workflows and infrastructure dependencies.
Check:
- The expected Kubernetes version is running.
- All required nodes are
Ready. - Deployments have their intended available replicas.
- Networking and storage work as expected.
- Required add-ons are healthy.
- No new persistent readiness blockers have appeared.
- Application smoke tests pass.
Step 7: Compare Before, During, and After
Use a results table to make the change auditable.
| Observation | Before | During | After |
|---|---|---|---|
| Cluster version | Record actual version | Record observed transition | Confirm intended target |
| Node readiness | Record baseline | Record temporary changes | Confirm expected readiness |
| Deployment availability | Record available replicas | Record disruptions | Compare with baseline |
| Pod readiness | Record unhealthy pods | Record rescheduling and restarts | Confirm recovery |
| PDB status | Record allowed disruptions | Record any blockers | Confirm intended state |
| Storage | Record PVC status | Record relevant attachment events | Test required storage access |
| Application health | Run baseline tests | Monitor critical workflows | Repeat smoke tests |
| Upgrade blockers | Record existing issues | Record new blockers | Record unresolved issues |
Step 8: Document the Outcome
Finish with a concise change report containing:
- Source and target versions.
- Platform compatibility checks performed.
- Start and finish times.
- Observed node and workload disruptions.
- Readiness blockers and their resolution.
- CNI, CSI, and add-on validation results.
- Application test results.
- Remaining issues.
- The final change decision according to the organization’s acceptance criteria.
If a step was not tested, mark it as not tested rather than assuming it passed.
14. Troubleshooting and Common Upgrade Blockers
Upgrade problems are easier to resolve when each symptom is linked to a specific investigation.
| Symptom | Possible cause | What to inspect |
|---|---|---|
| Target release unavailable | Release not delivered, unsupported configuration, or access issue | VKS release availability and prerequisites |
| Upgrade rejected | Unsupported version transition or incompatible configuration | Documented upgrade path and cluster specification |
| Upgrade appears stalled | Controller reconciliation issue, unavailable dependency, or readiness blocker | Cluster status, events, and applicable VKS management logs |
Node remains NotReady | Node configuration, networking, runtime, or infrastructure issue | Node conditions and platform-specific diagnostics |
Pods remain Pending | Insufficient capacity, scheduling constraints, or storage requirements | Pod events, node resources, affinity, and PVC status |
| Node drain is blocked | PDB or insufficient healthy replicas | kubectl get pdb -A and workload health |
| Networking fails after update | CNI incompatibility or configuration issue | CNI health, pod connectivity, and supported compatibility |
| Volumes fail to attach or mount | CSI or storage compatibility issue | PVCs, volume events, CSI health, and storage configuration |
| Application fails despite healthy nodes | API incompatibility, dependency change, or application regression | Application logs, API usage, smoke tests, and telemetry |
| Performance changes after update | Resource contention or configuration changes | Baseline metrics, CPU, memory, network, and storage latency |
Troubleshooting Sequence
When an upgrade does not proceed as expected:
- Confirm which lifecycle stage is in progress.
- Determine whether the blocker is at the platform, cluster, node, add-on, or application layer.
- Inspect the relevant status, events, and logs.
- Compare the observed state with the pre-upgrade baseline.
- Verify the documented prerequisites and supported remediation.
- Make one controlled change at a time.
- Revalidate cluster health and application behavior before continuing.
Avoid manually deleting or recreating VKS-managed resources to force an upgrade forward. Use the documented lifecycle controls and recovery procedures for the relevant release.
15. Key Takeaways
- VCF, Supervisor, VKS service, and Kubernetes cluster lifecycles are related but distinct.
- VKrs represent platform-managed Kubernetes releases and should not be treated as interchangeable with the VKS service or VCF version.
- Asynchronous release delivery can separate release availability from broader platform release timing, but it does not remove compatibility requirements.
- A release being available does not mean that every existing cluster is eligible to upgrade to it.
- Version compatibility includes control-plane and worker versions, node dependencies, CNI, CSI, add-ons, APIs, and application requirements.
- PodDisruptionBudgets help govern voluntary disruptions, but they do not guarantee application availability under every failure condition.
- Rolling node replacement requires adequate capacity, safe workload handling, and validation of replacement nodes.
- TuneD profiles and performance changes must be supported by the node environment and validated through measurement.
- Enterprise release governance should document which versions are approved for lab, development, staging, production, and retirement.
- A reliable upgrade process captures cluster state before, during, and after the change and validates application behavior as well as infrastructure health.
16. What I Learned
Use this section to record what you observed in your own VKS lifecycle lab.
You can discuss how the cluster’s state changed during the upgrade, which readiness checks identified potential blockers, how PDBs affected the planned maintenance, and whether application validation revealed issues that were not visible from the node status alone.
A useful reflection should distinguish between what the documentation predicted and what the lab actually demonstrated. If you have not performed the upgrade, describe the intended validation plan instead of claiming a successful upgrade or zero downtime.